1. Monitor layout you can live with
A second screen for chat and streaming software is the single biggest workflow upgrade. Mount both so the surface underneath stays usable.
A streaming desk has to do two jobs at once: it is a workstation you sit at for four to eight hours, and it is a film set the audience sees the whole time. The gear that matters most is the gear that touches both — the monitor layout you live with, the microphone the audience hears, the light the camera sees, and the cables that would otherwise be in the shot.
This guide walks through those decisions in the order that saves the most rework: layout first, then audio, then light, then the finishing touches. It is research-based, not hands-on tested — where a model is named, the specs are quoted from the manufacturer's own listing, checked October 1, 2026.
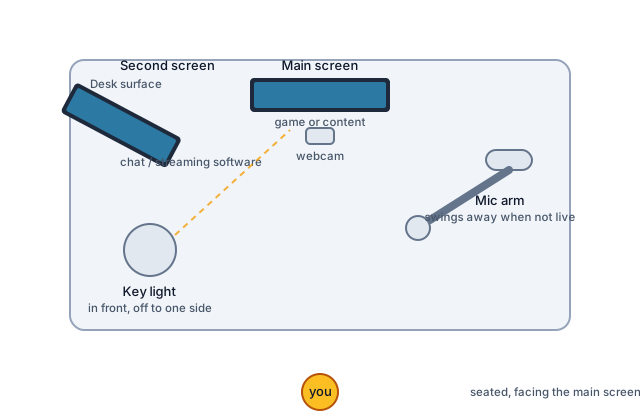
Illustration: DeskGearScout
Most streamers run two jobs on their monitors: the game or content on the main screen, and chat, streaming software, and alerts on a second screen. Putting the second screen on the stock stand it shipped with eats the desk; putting both on arms reclaims the surface underneath for keyboard, stream deck, and notes.
The checks that decide the mount are the same as for any dual-screen desk: whether each monitor has VESA 75 or 100 holes on the back, whether the desk edge can take a clamp, and how deep the desk is. Angle the second screen toward you so chat is a glance, not a head turn. If your desk pushes against a wall, check the arm's swing before you buy — our single vs dual monitor arm guide and against-a-wall guide walk through both decisions, and monitor arm vs monitor riser covers the VESA and clamp checks.
A microphone on a desk stand picks up every desk vibration — keyboard thumps, mouse clicks, the bump when you lean on the surface. A boom arm clamps to the desk edge and suspends the mic in the air, which does three things at once: it holds a fixed distance from your mouth (so your volume stays consistent when you move), it decouples the mic from desk vibration, and it swings completely out of the camera frame when you are done.
| Situation | Better choice | Why |
|---|---|---|
| You stream long sessions at one desk | Boom arm | Fixed mic distance and no desk vibration, session after session |
| You switch between streaming and normal desk work | Boom arm | Swings away from the camera and out of your way when not live |
| Your desk edge cannot take a clamp | Desk mic (or grommet mount) | An arm needs a clamp-safe edge or a grommet hole to attach to |
| You move the mic between rooms | Desk mic | A clamped arm stays with the desk; a desk mic travels |
Before buying an arm, check two numbers: the arm's rated mic-weight range against your microphone plus its shock mount, and the clamp's maximum desk thickness against your desk. Those two numbers decide fit more reliably than any review. For the broader audio picture — placement, room echo, and when a better mic is worth it at all — see our microphone basics guide.
On a stream the camera sees your face for hours, so lighting consistency matters more than it does on a thirty-minute call. One soft panel light in front of you, slightly off to one side and a little above eye level, fixes most of the "grainy and tired" look. Keep it out of the monitor's reflection path so it does not put glare on your screens.
What to look for in the light itself: adjustable brightness and color temperature, so you can match the room as daylight changes. Elgato's Key Light, for example, lists 2,800 lumens of adjustable brightness, a 2,900–7,000 K adjustable color range, and a mount that extends up to 49 in with a clamp that opens to 2.35 in (per Elgato's tech specs, checked October 1, 2026) — those three numbers are the practical fit checks: bright enough to be your main source, warm-to-cool range for day-to-night streams, and a clamp that actually fits your desk edge. Our video-call lighting guide covers the direction, glare, and consistency fundamentals in more depth.
A streaming desk is not a static desk. Mic arms swing, monitor arms tilt, and sit-stand streamers change height mid-broadcast — every one of those moves tugs on cables. Route cables along the arms themselves where possible, leave slack loops at each pivot point instead of pulling runs taut, and keep power and USB/audio runs separated enough that you can trace a problem during a stream. A single-cable spine from the desk to the PC keeps the moving parts independent from the fixed ones.
The details — routing order, under-desk trays, and the one-cable approach — are in our single-cable desk setup guide and cable management basics.
Viewers hear your room as much as your voice. The two cheapest fixes are also the most effective: get the mic close to your mouth so your voice dominates the room sound, and soften the hard surfaces the mic faces — a rug under the desk, curtains on a bare window, a bookshelf behind you. Acoustic panels help most on the wall the mic points at, not the wall the camera sees; treating the visible wall is set dressing, treating the mic-facing wall is audio engineering.
We have not hands-on tested acoustic panels, so buy on published absorption specs and return policies, not on marketing claims about "studio sound."
The camera sees your desk surface for the entire stream, and a worn or visually noisy surface reads as clutter even when the desk is tidy. A large desk mat in a solid, camera-friendly color calms the frame and gives the keyboard and mouse a consistent surface — the same mat categories we cover in our desk mat comparison. If you are choosing between mat types first, desk mat vs mouse pad explains when a full mat earns its space.